Snow Day Noodles

Snow Day Noodles

We have had an unruly winter this year. The hardest part right now is that we still have plenty more ahead of us. So, I want to share a recipe that I created for my family this winter that chases the cold away and is great both the night I make it and for lunches the next day or so. As always, credit where credit is due, this recipe was inspired by Jamie Oliver’s book Jamie’s America. His recipe is called Fiery Dan Dan Noodles and is much spicier than the one I make for our house.

Here’s a little motivation to try a new recipe that takes very little time to make and can be enjoyed for days to follow. This morning I read a FB post form a friend of mine that said it took her over an hour and a half to drive two miles to the El platform where she transfers to take the train into the loop for work today. What’s worse is that the trend this winter has been for it to snow incredibly and then the temperature snaps to extra frigid for the following couple of days. And, I do mean that type of cold that gets you straight to your bones and kinda makes you ache a little.

Soup has been my family’s go to solution for this weather. And new among the recipes is this hot, brothy, noodle dish with beef protein and tons of cool and nutritious green vegetables.

Ingredients:

2 chicken bouillon cubes

1/2 lb of ground beef

2 tablespoons of honey

10 oz of chinese wheat noodles (substitute gluten free noodle if you want/need)

1 head of napa cabbage

4 baby bok choy

1/2 dozen stalks of chinese broccoli

8 cloves minced garlic

3 tablespoons of dark low sodium soy sauce

3 tablespoons of vegetable oil

1 tablespoon of chili oil

2 scallions – whites minced, greens roughly sliced

1 lime quartered

Directions:

1) Boil bouillon cubes in four cups of water

2) In skillet over medium-high heat, add beef and cook through

3) Drain excess fat from skillet and stir in honey for 30 seconds. Set skillet aside and off of heat

4) Slice cabbage, broccoli stalks and quarter bok choy (removing middle stem)

5) Rinse and spin green vegetables

6) Stir noodles into broth and cook according to directions

7) In last minute of cooking stir into broth the vegetables, garlic, oils, soy sauce, and scallion whites

8) Serve broth and noodles into serving bowls, sprinkle with crispy beef and scallion greens, giving each diner a wedge of lime to squeeze into their soup.

Package and reheat for lunch:

1) Pack noodle mixture separate from beef, scallions, and lime.

2) Add 1-5 tablespoons of water to noodles, heat in microwave for about 90 seconds, stir in lime juice, beef and scallion greens. Enjoy!

Please remember that I am happy to answer any questions you may have when trying these recipes. So, just drop me a note through my contact page and I’ll guide you through with greater detail and attention.

Stay warm, Enjoy!

Beef Tenderloin for a Family Visit

Let me begin with a little of my own philosophy. If you write a food blog about a mountain of work you and your wife did to put on a fabulous dinner for charity, you can’t really order in chinese food when your parents drive a couple hundred miles to visit you for the weekend. Nor did I want to do that.

So this weekend, we did two special meals with my parents – pancake breakfast and beef dinner. For dinner the table was set for six because my sister and her date joined in the fun. The menu was fairly straight forward:

Pepper-crusted beef tenderloin with wild mushroom risotto and a green salad topped with pears, nuts, and honey goat cheese. Following we had night caps and make your own ice cream sundays.

Multiple steps ready the beef for the oven and then the plate – the path to divine taste follows:

Ingredients: Beef tenderloin, black peppercorns, salt, sugar, orange zest, nutmeg, baking soda, vegetable oil

Instructions:

1) Remove meat from refrigerator and truss for cooking at least one hour ahead of cooking.

2) In a saucepan over low-medium heat boil peppercorns in just enough oil to cover for ten to fifteen minutes. This process mellows the peppercorns, so the longer you go the more mild they become. Be sure to adjust the heat to prevent the peppercorns from burning. Drain and discard oil.

3) Once peppercorns are cooled to room temperature, combine in grinder with nutmeg and orange zest. Grind into fine powder.

4) Mix salt, sugar, and baking soda in small bowl.

5) Adjust oven rack to center and preheat to 300 degrees F

6) Rub meat on all sides with salt mixture

7) Rub meat on all sides with pepper mixture and place on roasting pan

Raw Crusted Tenderloin


8) Pierce meat with thermometer in thickest section of beef and place in oven

9) For medium-rare, remove meat once it has reached 120 degrees F

10) Heat vegetable oil to large skillet over medium-high to high heat

11) Sear beef in the skillet on all sides – approximately one to two minutes per side

12) Allow beef to rest on a cutting board, tented under foil, for ten to fifteen minutes

Tented Tenderloin


13) Carve the beef into desired portions.

Pepper-crusted Beef Tenderloin


Enjoy immensely as we all did with either a pinot noir to compliment the beef or a sweeter red wine to balance the heat of the pepper crust.


Wild Mushroom Risotto

Making your house smell delicious is a wonderful gift for your family and friends. It can make the stresses of one’s day dissipate or take a great day and make it even better. And, one of the highlights of the winter for me that does all of these things has been learning how to make a wonderful risotto.

Credit where credits is due, this recipe is from Giada de Laurentiis. But, it has given me the confidence to offer delicious risotto to my friends and family. And, from the techniques learned here, I have built other combinations of risotto that allow me to stay seasonal and local with my ingredients, which really makes me happy.

This dish can be served as a side dish but here at our house it has become the main attraction. For those of you who think risotto is out of your reach, please just try this and then decide.

Myths busted through this recipe:

1) Risotto is impossible to make at home – nope!

2) Risotto requires too much time – nope again – about 45 minutes.

3) Risotto requires constant stirring – there’s plenty but constant is not the right way to say it.

Here are the ingredients:

5 3/4 cups of chicken broth

1/2 ounce dried porcini mushrooms

1/2 cup unsalted butter

2 cups finely chopped onion

10 ounces mushrooms (mixed)

2 minced garlic cloves

1 1/2 cups Arborio rice

2/3 cup dry white wine

1/2 cup frozen peas

2/3 cup grated parmesan cheese

How to put it together:

1) Bring chicken broth to a simmer in sauce pan

2) Remove broth from heat, add porcini mushrooms, cover, set aside for 5 minutes

3) Remove porcinis from broth to cutting board

4) Return broth to stove top over low heat

5) In a separate heavy saute pan melt butter using medium heat

6) Once melted, add onions and saute until tender (~8 minutes)

7) Medium chop all mushrooms

8) Add all mushrooms, and garlic to onions and saute until tender and juices evaporate (~10 minutes)

Sauteed Mushrooms, Onion, and Garlic

9) Stir in rice and wine

10) Stir slowly until all liquid is absorbed (~2 minutes)

11) Add a cup of broth and stir in to rice, stir on and off until all liquid is absorbed (~3 minutes)

Repeat #11 until all broth is incorporated and mixture is creamy.

12) Stir in peas, remove from heat, stir in parmesan

Wild Mushroom Risotto

Serve and Enjoy

Lakeshore Drive Charity Dinner

Part I – Menu Planning

The time has come for me to prepare, test, and deliver one of the two charity dinners I donated to a local charity’s silent auction. In this installment, I will tell you about the set up and first draft of the menu. For all those fundraising friends of mine in the audience, this is where the foundation of great relationships with the donor and his/her guests starts.

Winner number one has one of the most amazing vintage apartments I have ever seen. It is over 3,000 square feet and is perched on Lakeshore Drive, overlooking Lake Michigan. The home is adorned with gorgeous furnishings, persian rugs, and the art is everywhere. The setting is nothing short of fabulous.

LakeShoreDriveNight-314x210

I really enjoyed every detail, including the snooty, balding doorman in uniform who only allowed me into the building through the back door – and even then he was sniffy about it. Predictably, I loved it.

The table will be set for six diners – three couples and the winner selected the five-course option with a fall (non Thanksgiving) theme.

I have to pause and recognize Emily here because, I would not be able to pull this off without her support and input. So thank you Emily, I think we have composed a menu that will really delight.

Here’s what we came up with:

Course 1 – Appetizers

Olive tapenade, bacon-wrapped dates and apricots, local cheese tray, and rosemary-chipotle roasted nuts

Course 2 – Soup

Butternut squash soup with fried leek garnish, finished with rosemary olive oil

Course 3 – Pasta

Wild mushroom and green pea risotto

Palate cleanser – sorbet or granita (TBD)

Course 4 – Entree

Medallions of beef tenderloin au poivre, silky potatoes, and green vegetable (TBD)

Course 5 – Dessert

Warm apple pie and seasonal ice cream – both hand crafted by me

That’s it – right…

As you may have guessed, I do have a couple of surprises that I may try to add to the menu to amp this up a little more. Of course, this is all subject to approval from the winner.

What you have to understand is that I want to knock this out of the park. And since now is such a “dangerous” time to be looking around my kitchen and pantry for items to use to build fun and tasty add-ons, I know there will be a little something extra for the party.

If you’ve been a regular reader of this blog you may remember that I have things like bourbon cherries and pumpkin vodka just hanging out waiting to be enjoyed, so there is no telling what I might add on the night of the main event.

Part II – Menu Testing

The week leading up to the event was menu item testing week. I wanted to determine a few things:
1) how does each item taste
2) how long does each take to prepare
3) does the prep of any item raise any surprises

So, let’s start at the beginning. The appetizers that worked without any trouble were the cheese tray, the tapenade, and the rosemary nuts. The cut of bacon and size of dates made a difference in the balance of the tastes. Once I found a source of consistent sized dates, the bacon took care of itself. The other problem with the dates was over caramelization of the brown sugar. I solved this issue by mixing all of the date toppings into a marinade that I reduces over low heat to combine. When the mixture cooled, I used it to fill a zip lock bag and dropped in the, now wrapped dates.

Next course was the soup. The recipe called for finishing it with sour cream and fried leeks. While these both provided great flavors, the cream created a weird mouth-feel and the leeks lost all of their crispy texture. On Emily’s prompting I tried topping the soup with homemade roasted pumpkin seeds – perfection. To guild that lily, I added a drizzle of high-end olive oil.

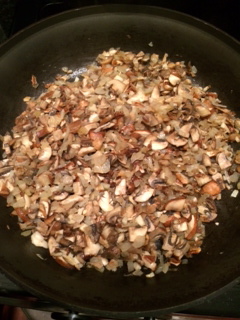
The third course was mushroom risotto. We loved it from start to finish. One thing we decided to do was make it on site to build a warm aroma in the home.

Course four was the main entree. A major thanks go out to my father-in-law because he “sponsored” a test roast. At $32.75 per pound, I definitely wanted to get this right and his generosity allowed me to do a test run. I mean, I invited him over for the test meal (of course). And, we found out that this was a great exercise because it revealed that the peppercorn crust was delicious but way too coarse. It also revealed that this meat took less time to cook that I had estimated. Using a coffee grinder to pulverize the meat rub solved our problem.

Finally, we wrapped up the meal with the apple pie and cinnamon ice cream. No problems presented themselves in the test meal.

Part III – The Big Night

In a few words – IT WORKED!

Wow! Emily and I worked like crazy for six sensational guests and produced everything I wanted, almost as well as I wanted. Most importantly, the hostess said a lot of great things about the meal but the part that made me most proud and happy was “…Andy, you really exceeded my expectations…”

What else is there to say!?!

Mission accomplished.

Here are a couple of the details that I want to mention:
1) Emily and I took just about every utensil and cooking vessel we own and packed our little Corolla to the gills. Thankfully, because we had everything we needed. Next time I do one of these dinners, I am definitely going to add a practice “pack up the car day” to menu testing week.

2) We arrived to the building at 5:30 PM and left at 11:30 PM. We got home dead tired and prepared to do nothing at all the next day. All in all, this was at least as much work as we thought it would be.

3) Three notes on the guests: One was a huge foodie; another, a professionally trained and retired chef; and, two of the guests were more than fashionably late.

So, how did that all go…I am happy to say that the foodie was in awe, starting with the app course and ended up being pretty fun to talk to during prep and in between courses. The affirming f-bomb he belted out (repeatedly) about how awesome the ice cream has become a fun memory.

The chef/guest sincerely applauded the risotto and went on to clean that plate and endorse its quality to his fellow guests – phew!

The late guests … I mean, sometimes I just need to chillax because waiting on starting the meat didn’t change the meal at all – it simply happened a little later on in the evening.

4) Development purposes – I met, impressed, and formed connections with everyone at that party. I learned about their interests in a safe environment and now can approach them based on their own individual personalities.

The meal was a special time for all. Everyone had fun and made a good memories that we can revisit over and over for years to come.

I think it was a complete success and look forward to the next one.


Fall Infusion

Pumpkin Vodka

Three years ago I found this amazing recipe for pumpkin-infused vodka that I had to try out. Picture this – you are visiting a house that you or your significant other once called home, inside jokes and the adolescence you tried to hide from everyone you now know is being paraded around by family members with twisted enthusiasm, and someone’s child is crying. Your are stuffed to the gills with turkey but need to fill in the cracks with something sweet and intoxicating.

BAM-O! Pumpkin pie with vodka, of course!

Here’s how you infuse the right flavors into your vodka:

2 cups of sugar pumpkin, cubed 1/4″ and roasted at 350 for 20 minutes
3 cups of vodka
3 chunks of crystallized ginger, sliced lengthwise
2 vanilla beans
1 cinnamon stick

After the pumpkin is cool, mix all together in glass container and seal with plastic wrap and a rubber band. Jostle the container a little every other day for just over a week.

Strain infused vodka back into original bottle and keep in refrigerator between uses.

Enjoy!

Delicious is in the Details

An Old Fashioned cocktail is not a lot of things other than “just what the doctor ordered” and just plain great. But, you can make it truly memorable using a couple of tiny details to set it apart. For me, and those who drink these cocktails with me at my home, the delicious detail is tart, locally grown, homemade bourbon cherries.

Yep, these are just the garnish. But what an exciting finish!

My cherries came from Mrs. Morgan’s cherry tree and were hand picked by me and her rocket scientist husband. Based on the success I had with them this year, I will pick and brine a bucketful to give away as stocking stuffers and/or hoard at home for my own consumption.

For the cherries, I washed them, picked out the losers, and added to a ball jar. To that jar I added a brine of brown sugar and Bourbon. Once the brined cherries were cooled to room temperature, I capped them and putt hem in the refrigerator for two weeks before serving. And, I really believe these get better with age. It has now been three months and they are a true delight.

For the Old Fashioned you will need:
1 low ball glass
1 ice sphere
A splash of soda water
1 tablespoon of ginger syrup
1 tablespoon of cherry bourbon syrup
2 oz Bourbon
1 piece of shaved orange zest

Mix soda, bourbon, syrups, and essential oils of orange peel. Pour over ice sphere and garnish with orange zest and three bourbon cherries.

Enjoy immensely!

Craft Cocktail: Ludington Snuggler

When I was a kid, we went to Apple Charlie’s to pick apples, voraciously tear through cider donuts, and drink warm cider. My brothers, sister, and I would also stare with amazement (year after year) at the cider press. We also picked apples that my Mom would bake, make into pies, and slice into our oatmeal and lunch baggies for the next couple of weeks. It just seemed like one of those routines I just could not over do.

Likewise, at college football games, I remember when I first enjoyed the warm sips of cider and Jim Beam delivered to me as a nineteen-year-old out of a boda bag that had been smuggled in under the armpit of one of my older (by at least six months to a year) and wiser fraternity brothers. It just felt and tasted so rich and great . . . and, a little dangerous.

I loved it.

Fast forward to last week to my vacation when Emily and I had toured Ludington, taking in the sights on a cold, gusty, grey day – having a ton of fun and celebrating our life together. We decided to head to a dinner place that had come highly recommended by our B&B hostess and boasted a great deal of promise from its online menu. One of the items that caught out attention was a drink they called the Warm Woodford Cider.

When we got to the restaurant, all looked good. There was a bourbon tasting that included some on my faves and a robust atmosphere filled with conversation and fun.

The only problem – something was missing form the menu. No Warm Woodford Cider, hmmm.

Emily asked the server if we had missed the cocktail – maybe it was part of a seasonal offering that occurred prior to this evening out for us? Nope, the restaurant had changed management and the drink was out with the old. This would have stopped the deal for most but, we were chilled to the bone from our adventure and just had this idea in our head that this is something we wanted. I mean, what’s the harm in asking if they have some cider around, right?

As luck would have it – they did. And though the mixologist shared that she did not know the recipe for the Warm Woodford Cider she agreed to give it her best shot.

Within minutes we had been sent a drink to taste along with a request for feedback. Awesome.

The one we had with dessert was even better.

Local cider, bourbon, cinnamon sticks, whole cloves, and carmels

At home we call this the Ludington Snuggler.

Here’s our version: cider, bourbon, cloves, cinnamon stick, optional carmel. Simmer cider, cloves, and cinnamon for about five minutes. Place carmel and bourbon in mug. Pour hot cider through strainer and into the mug. Stir.

Enjoy!

Grilled Pork Chops, Apple Cabbage Slaw, Roasted Butternut Squash

IMG_1258

Last night, prior to today’s brief snow flurry, I spent some time on the balcony grilling a couple thick-cut pork chops. After waiting about an hour at the butcher to get these babies, the question seems obvious – were they worth the wait?

Yep.

The chops are accompanied by a simple raw apple and cabbage slaw and even simpler roasted butternut squash. The meal was terrific. Here’s how it goes:

Chops – sea salt, pepper, and olive oil on both sides. Grilled over direct heat for 5 minutes per side and rested for 5 minutes.

Slaw – matchstick fresh fall apples mixed with cabbage and dressed with dressing of equal parts veg oil and apple cider vinegar, half part of honey and salt and pepper to taste. Shake, dress lightly, mix with hands, and refrigerate.

Squash – peel, cube (1/2 to 3/4 inch), toss in olive oil salt and pepper, spread in a single layer on baking sheet and roast at 350 for 25-35 minutes.

Fall Favorites Teaser

Emily and I just spent time in northwest Michigan, reclaiming the lost falls of the last few years. The colors were amazing, our B&B – simply cozy, and our adventures unforgettable.

On our way home we picked up huge pumpkins to carve and toured Virtue Ciders and Three Floyd’s Brewery. And, to boot, we took one of the last trips to the Green City Market. All of which inspired me to get back to giving you what you want – more time in the kitchen, behind a camera lens, and at the keyboard, sharing it all.

And, since I have already taken some of the pictures, I can honestly say I will be delivering some great content to you this week.

Here’s what I think you need to know – the crisp air of fall that is filling my lungs these days makes me hanker for a house filled with the rich aromas of soup, the unctuous flavors of earthy pasta sauces, and the frost bitten finger tips that accompany grilling on my balcony.

To satisfy everyone’s souls, now is also the season of pumpkin beers, casked brews you can’t see through, and brown liquor cocktails. For fun I have also prepared a few traditional warm drinks from my childhood. As you may expect, where my folks responsibly forewent the addition of “spirited” ingredients – I did not.

Stay tuned, I’m back and fall goodness is on its way!

Care Package

image

If you are a fan of traditional, maybe even “old fashioned” home cook delicacies like lemon meringue pie, warm-from-the-oven chocolate chip cookies, bunt cakes, peanut butter cookies, and banana bread, then we definitely have some common ground.

This morning I was treated to a special piece of caring in the shape of a care package that had arrived the evening prior – a loaf of zucchini bread. And this is really some of the best because it was hand made from scratch by my youngest sister-in-law, Carolyn.

So, in the spirit of this page and the literal interpretation of my tag line, I am sharing a little bit of the awesomeness that found itself on my cutting board. As Emily says to me on occasion, food sometimes nourishes your soul. And, this certainly did.

Thanks Carolyn for caring and sharing your delicious bread.

p.s. the recipe is from the family so I’m keeping it to myself this time. Just remember, if you have to add butter or jam, you can get better zucchini bread.